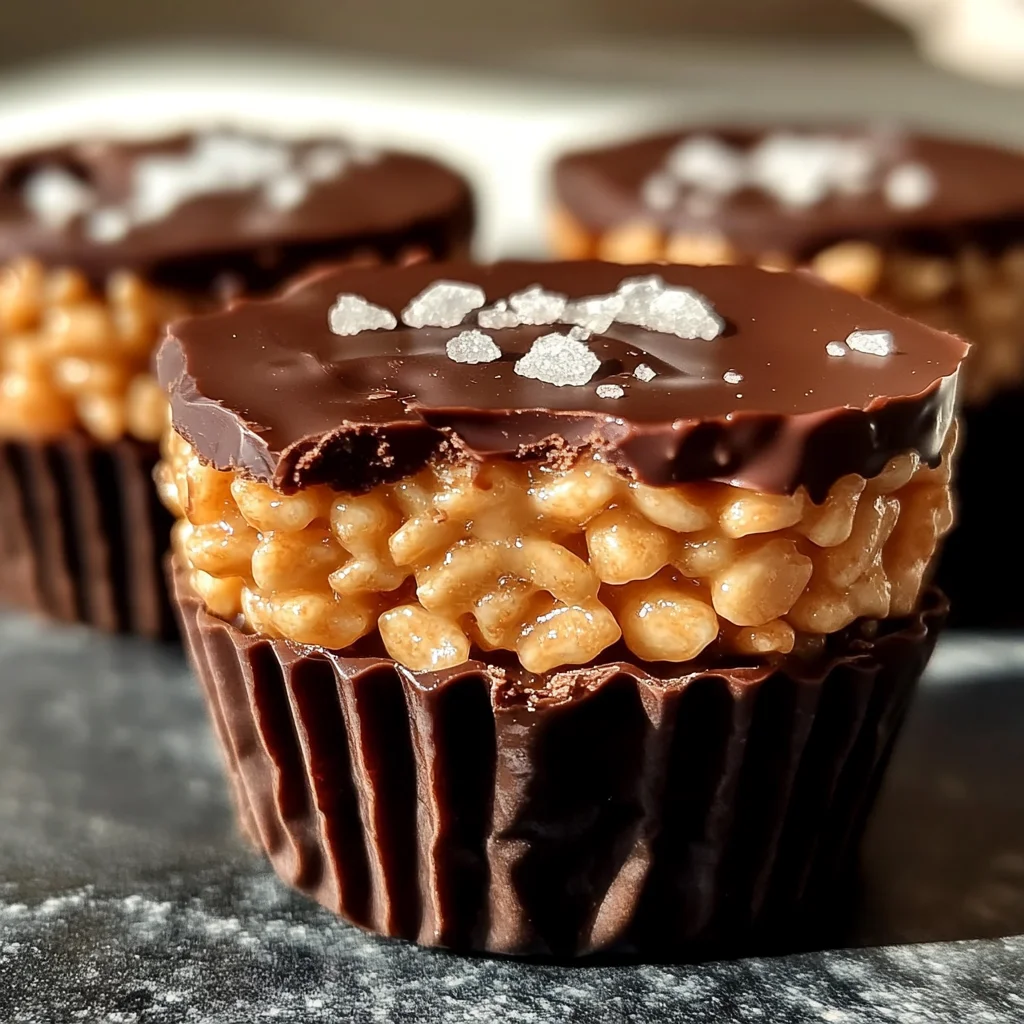
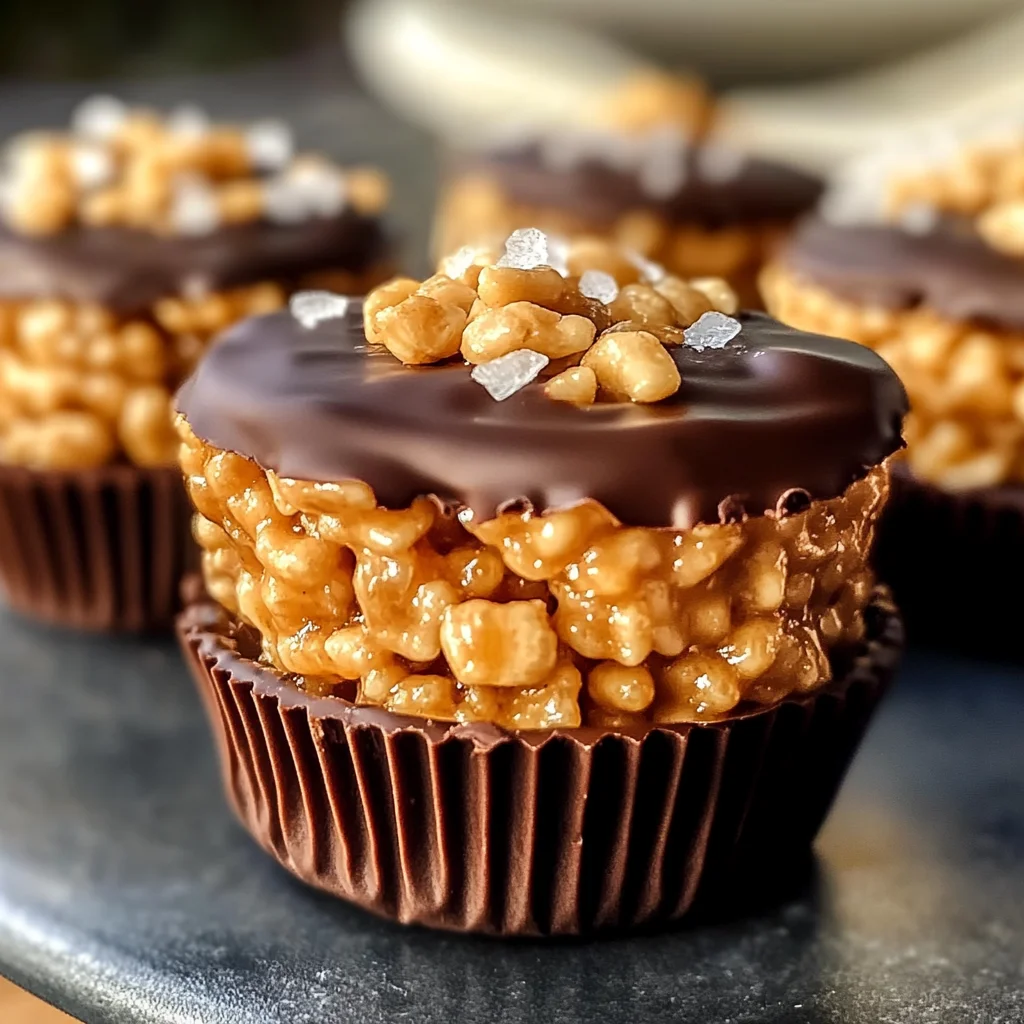
Chocolate Peanut Butter Rice Krispie Cups
Quick, easy, and irresistibly delicious, these no-bake Chocolate Peanut Butter Rice Krispie Cups are the ultimate treat! The perfect balance of creamy peanut butter, rich chocolate, and crispy Rice Krispies creates a snack everyone will adore. Whether for parties, family gatherings, or a sweet pick-me-up, these cups are guaranteed to satisfy your cravings!
Why You’ll Love This Recipe
- No-Bake Convenience: Enjoy a delightful dessert without turning on the oven; perfect for warm days.
- Quick Preparation: Ready in just 20 minutes, making it an ideal last-minute treat for any occasion.
- Kid-Friendly Fun: Engage kids in the kitchen with this easy-to-follow recipe that results in a fun and tasty snack.
- Customizable Flavor: Swap ingredients easily to suit your taste; add nuts or dried fruits for extra texture.
- Perfect for Sharing: With 20 servings, these cups are great for parties or as homemade gifts.
Tools and Preparation
To make your Chocolate Peanut Butter Rice Krispie Cups, having the right tools is essential. Here’s what you need to get started.
Essential Tools and Equipment
- Medium saucepan
- Mixing bowl
- Muffin tin
- Paper liners
- Microwave-safe bowl
- Spatula
Importance of Each Tool
- Medium saucepan: Ideal for melting ingredients evenly without burning them.
- Mixing bowl: Provides enough space to combine all ingredients thoroughly without spills.
- Muffin tin: Perfect shape for creating individual servings that hold their form well.
Ingredients
Here are the ingredients you’ll need to create these delightful treats:
For the Base
- 3 cups Rice Krispies cereal
- 1 cup creamy peanut butter
- 1/2 cup unsalted butter
- 1 cup mini vegan marshmallows
For the Topping
- 1 cup chocolate chips
- 1/2 tsp vanilla extract (optional)
- Pinch of sea salt (optional)
How to Make Chocolate Peanut Butter Rice Krispie Cups
Step 1: Melt the Base
In a medium saucepan over low heat, melt the unsalted butter and mini vegan marshmallows. Stir consistently until smooth.
Step 2: Add Peanut Butter
Once melted, remove from heat and stir in the creamy peanut butter and vanilla extract, if using. Mix until fully combined and creamy.
Step 3: Mix with Cereal
Pour the Rice Krispies cereal into a large mixing bowl. Add the peanut butter mixture. Gently fold until all the cereal is coated evenly.
Step 4: Shape the Cups
Line your muffin tin with paper liners. Spoon the mixture evenly into each cup, pressing down gently to form a flat surface.
Step 5: Add Chocolate Layer
Melt the chocolate chips in a microwave-safe bowl using 20-second intervals. Stir between intervals until fully melted. Spoon melted chocolate over each cup and spread evenly. Sprinkle with sea salt if desired.
Step 6: Set & Serve
Allow the cups to cool at room temperature for about 20 minutes, or place them in the refrigerator to set faster. Once firm, remove from paper liners and serve!
Enjoy your delicious creations!
How to Serve Chocolate Peanut Butter Rice Krispie Cups
These delightful Chocolate Peanut Butter Rice Krispie Cups are perfect for various occasions. Whether you’re hosting a party or enjoying a cozy night in, there are plenty of ways to serve and enjoy these tasty treats.
As a Sweet Snack
- A quick pick-me-up during the day when you need an energy boost.
For Parties
- Arrange them on a decorative platter for a stunning dessert table centerpiece.
With Ice Cream
- Place a scoop of your favorite vanilla or chocolate ice cream on top for an indulgent dessert.
As Party Favors
- Package individual cups in clear bags tied with ribbons for guests to take home.
At Movie Nights
- Serve alongside popcorn for an exciting mix of sweet and savory flavors.
How to Perfect Chocolate Peanut Butter Rice Krispie Cups
Perfecting your Chocolate Peanut Butter Rice Krispie Cups can elevate your treat game. Here are some tips to ensure they turn out fantastic every time!
- Use High-Quality Ingredients: Opt for quality chocolate chips and peanut butter for richer flavor.
- Don’t Overheat: Melt the marshmallows and butter slowly over low heat to avoid burning.
- Press Firmly: Make sure to press the mixture firmly into the muffin tin to help them hold their shape.
- Chill Thoroughly: Refrigerate them long enough for proper setting, ensuring they won’t crumble when removed from liners.
Best Side Dishes for Chocolate Peanut Butter Rice Krispie Cups
Pairing side dishes with your Chocolate Peanut Butter Rice Krispie Cups can create a balanced snack spread. Here are some excellent options!
- Fresh Fruit Skewers
Brighten up your plate with colorful fruit skewers, offering a refreshing contrast. - Veggie Sticks with Hummus
Crunchy veggie sticks served with creamy hummus add a healthy touch. - Cheese Platter
A selection of cheeses complements the sweetness beautifully and adds richness. - Popcorn Mix
Create a fun mix of sweet and salty popcorn that will delight both kids and adults alike. - Yogurt Parfaits
Layer yogurt with granola and berries for a tasty, nutritious option alongside your cups. - Chocolate-Dipped Pretzels
The salty crunch of pretzels dipped in chocolate pairs perfectly with the sweetness of the cups. - Trail Mix
Offer a variety of nuts, seeds, and dried fruits as a crunchy side option that balances flavors well.
Common Mistakes to Avoid
Making Chocolate Peanut Butter Rice Krispie Cups can be delightful, but there are a few common mistakes to watch out for.
- Not measuring ingredients accurately: Failing to measure ingredients properly can affect the texture and flavor. Use measuring cups and spoons to ensure accuracy.
- Skipping the cooling time: Rushing to enjoy your cups before they set can lead to a gooey mess. Allow enough time for them to cool completely, which enhances their structure.
- Using low-quality chocolate: The chocolate layer is crucial for flavor. Opt for high-quality chocolate chips for a richer taste and better melting consistency.
- Overmixing the cereal mixture: Mixing too vigorously can crush the Rice Krispies, making them lose their crunch. Fold gently until just combined for optimal texture.
- Not using liners or greasing the tin: This can lead to sticky situations when trying to remove the cups from the muffin tin. Always use paper liners or grease the tin well.
- Ignoring optional ingredients: Optional ingredients like sea salt or vanilla extract can elevate flavors. Don’t skip them if you want a more complex taste profile.
Storage & Reheating Instructions
Refrigerator Storage
- Store in an airtight container.
- These cups will last up to 1 week in the refrigerator.
Freezing Chocolate Peanut Butter Rice Krispie Cups
- Wrap each cup individually in plastic wrap.
- Place them in a freezer-safe container; they will keep for up to 2 months.
Reheating Chocolate Peanut Butter Rice Krispie Cups
- Oven: Preheat to 350°F (175°C). Place cups on a baking sheet for about 5 minutes.
- Microwave: Heat in 10-second intervals until warmed through; be careful not to melt them.
- Stovetop: Place in a skillet over low heat, covering with a lid until warm.
Frequently Asked Questions
Many people have questions when it comes to making Chocolate Peanut Butter Rice Krispie Cups. Here are some common queries answered!
Can I use crunchy peanut butter instead of creamy?
Yes, you can! Crunchy peanut butter will add extra texture and flavor to your cups.
How do I make these Chocolate Peanut Butter Rice Krispie Cups vegan?
Use vegan marshmallows and ensure your chocolate chips are dairy-free for a fully vegan treat!
Can I customize the toppings?
Absolutely! Feel free to add sprinkles, nuts, or dried fruit on top of the chocolate layer for additional flair.
How long do these treats last?
When stored properly, they can last up to 1 week in the refrigerator or up to 2 months in the freezer.
Are there alternatives for peanut butter?
Yes! You can substitute almond butter or sunflower seed butter if you prefer different nut or seed flavors.
Final Thoughts
These Chocolate Peanut Butter Rice Krispie Cups are an easy and delightful treat that everyone will love. Their versatility allows for various customization options, so feel free to experiment with different add-ins or toppings. Give this simple recipe a try and enjoy a delicious snack that’s perfect for any occasion!

Chocolate Peanut Butter Rice Krispie Cups
- Prep Time: 10 minutes
- Cook Time: 10 minutes
- Total Time: 20 minutes
- Yield: Approximately 20 servings 1x
- Category: Dessert
- Method: No-Bake
- Cuisine: American
Description
Indulge in the delightful combination of creamy peanut butter and rich chocolate with these no-bake Chocolate Peanut Butter Rice Krispie Cups. Perfect for any occasion, whether it’s a casual snack or a festive treat at gatherings, these cups are quick to prepare and incredibly satisfying. With just a few simple ingredients, you can create a sweet sensation that pleases both kids and adults alike. They are customizable, allowing you to add your favorite nuts or dried fruits for extra texture. Enjoy the fun of making these easy treats with family and friends!
Ingredients
- 3 cups Rice Krispies cereal
- 1 cup creamy peanut butter
- 1/2 cup unsalted butter
- 1 cup mini vegan marshmallows
- 1 cup chocolate chips
Instructions
- In a medium saucepan over low heat, melt the unsalted butter and mini vegan marshmallows while stirring until smooth.
- Remove from heat and mix in the creamy peanut butter until fully combined.
- In a large mixing bowl, combine the Rice Krispies with the peanut butter mixture, folding gently.
- Line a muffin tin with paper liners and spoon the mixture into each cup, pressing down firmly.
- Melt the chocolate chips in a microwave-safe bowl using 20-second intervals, then spoon over each cup.
- Allow to cool at room temperature or refrigerate until set before serving.
Nutrition
- Serving Size: 1 rice krispie cup (45g)
- Calories: 181
- Sugar: 11g
- Sodium: 88mg
- Fat: 8g
- Saturated Fat: 3g
- Unsaturated Fat: 4g
- Trans Fat: 0g
- Carbohydrates: 25g
- Fiber: 1g
- Protein: 3g
- Cholesterol: 0mg